PinkHamburgers
Payload Specialist
2
MONTHS
2 2 MONTHS OF SERVICE
LEVEL 1
300 XP
This tutorial tackles on how to create a CRUD Operation in Angular JS using Ui-Router to manage our routes and PHP/MySQLi to handle our backend with MySQL as our Database. You will learn in this tutorial how to use UI-Router. Angular JS is a javascript framework maintained by Google and is capable of creating Single-Page Applications.
Getting Started
I've used CDN for Bootstrap, Angular JS, and Ui-Router so you need an internet connection for them to work.
Creating our Database
First, we're going to create our MySQL database.
Creating the Interface
This is the main view of our app and the place where we declare all our dependencies. Save the file as index.html
Creating the Angular Scripts
Note: In this Tutorial I compiled all the angular files and directories in the single folder naming js
.
app.js
This is the main angular script of our app.
services/memberService.js
This is the service that we created to handle our members and request.
controller/homeController.js
This is our controller for home.html
.
controller/addController.js
This the controller for our add.html
.
controller/editController.js
This is our controller for edit.html
.
controller/deleteController.js
This is our controller for delete.html
.
Creating the Interfaces
Note: I compiled the following files inside partials
folder.
home.html
As per our ui-router, this is considered to be our index view.
add.html
This contains the add new form.
edit.html
This contains our edit form.
delete.html
This is delete confirmation view.
Creating the PHP API Scripts
Note: I compiled the following files inside api
folder.
read.html
This is our PHP API the fetches data from our database.
add.html
Our PHP API that adds new data to our database.
edit.html
Our PHP API updates our selected data.
delete.html
Lastly, this is our PHP API that deletes our selected data.
DEMO
That's it! You can now test the Simple CRUD Web App using Angular JS and PHP in your browser. I hope this tutorial will help you to understand how to create a CRUD application in Angular JS and PHP and also for your future Web Application projects.
Explore more on this website for more Tutorials and Free Source Codes.
Happy Coding :)
Note: Due to the size or complexity of this submission, the author has submitted it as a .zip file to shorten your download time. After downloading it, you will need a program like Winzip to decompress it.
Virus note: All files are scanned once-a-day by SourceCodester.com for viruses, but new viruses come out every day, so no prevention program can catch 100% of them.
FOR YOUR OWN SAFETY, PLEASE:
1. Re-scan downloaded files using your personal virus checker before using it.
2. NEVER, EVER run compiled files (.exe's, .ocx's, .dll's etc.)--only run source code.
Download
Getting Started
I've used CDN for Bootstrap, Angular JS, and Ui-Router so you need an internet connection for them to work.
Creating our Database
First, we're going to create our MySQL database.
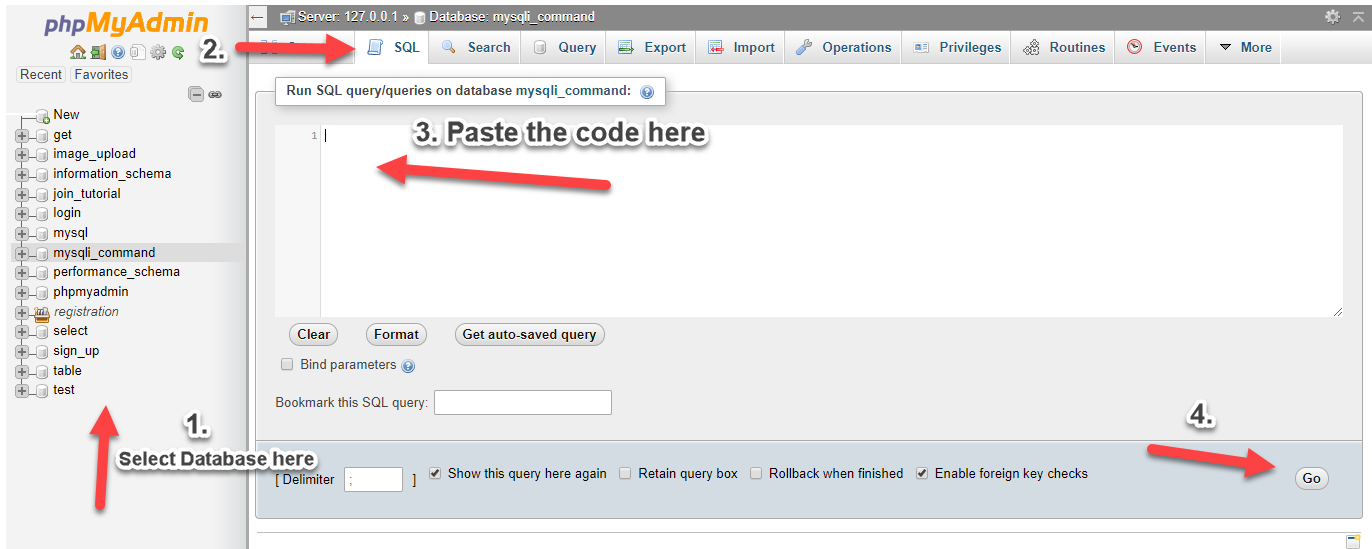
- Open phpMyAdmin
- Click databases, create a database and name it as angular
- After creating a database, click the SQL
and paste the below codes. See image below for detailed instruction.
- CREATE
TABLE
`members`
(
- `memid`
int
(
11
)
NOT
NULL
AUTO_INCREMENT
,
- `firstname`
varchar
(
30
)
NOT
NULL
,
- `lastname`
varchar
(
30
)
NOT
NULL
,
- `address`
text
NOT
NULL
,
- PRIMARY KEY
(
`memid`
)
- )
ENGINE
=
InnoDB
DEFAULT
CHARSET
=
latin1;
Creating the Interface
This is the main view of our app and the place where we declare all our dependencies. Save the file as index.html
- <!DOCTYPE html>
- <html
lang
=
"en"
ng-app=
"app"
>
- <head
>
- <meta
charset
=
"utf-8"
>
- <title
>
AngularJS CRUD using Ui-Router in PHP/MySQLi</
title
>
- <link
href
=
"https://maxcdn.bootstrapcdn.com/bootstrap/3.3.7/css/bootstrap.min.css"
rel
=
"stylesheet"
>
- <link
href
=
"https://maxcdn.bootstrapcdn.com/font-awesome/4.7.0/css/font-awesome.min.css"
rel
=
"stylesheet"
>
- <script
src
=
"http://ajax.googleapis.com/ajax/libs/angularjs/1.4.8/angular.min.js"
></
script
>
- <script
src
=
"https://cdnjs.cloudflare.com/ajax/libs/angular-ui-router/1.0.3/angular-ui-router.min.js"
></
script
>
- </
head
>
- <body
>
- <div
class
=
"container"
>
- <h1
class
=
"page-header text-center"
>
AngularJS CRUD using Ui-Router in PHP/MySQLi</
h1
>
- <!-- this is where we render our view -->
- <div
ui-view></
div
>
- </
div
>
- <!-- main script -->
- <script
src
=
"js/app.js"
></
script
>
- <!-- controllers -->
- <script
src
=
"js/controllers/homeController.js"
></
script
>
- <script
src
=
"js/controllers/addController.js"
></
script
>
- <script
src
=
"js/controllers/editController.js"
></
script
>
- <script
src
=
"js/controllers/deleteController.js"
></
script
>
- <!-- services -->
- <script
src
=
"js/services/memberService.js"
></
script
>
- </
body
>
- </
html
>
Creating the Angular Scripts
Note: In this Tutorial I compiled all the angular files and directories in the single folder naming js
.
app.js
This is the main angular script of our app.
- var
app =
angular.module
(
'app'
,
[
'ui.router'
]
)
;
- app.config
(
function
(
$stateProvider,
$urlRouterProvider)
{
- $urlRouterProvider.otherwise
(
'/home'
)
;
- $stateProvider
- .state
(
'home'
,
{
- url:
'/home'
,
- templateUrl:
'partials/home.html'
,
- controller:
'homeCtrl'
- }
)
- .state
(
'add'
,
{
- url:
'/add'
,
- templateUrl:
'partials/add.html'
,
- controller:
'addCtrl'
- }
)
- .state
(
'edit'
,
{
- url:
'/edit/{member:json}'
,
- templateUrl:
'partials/edit.html'
,
- controller:
'editCtrl'
- }
)
- .state
(
'delete'
,
{
- url:
'/delete/{member:json}'
,
- templateUrl:
'partials/delete.html'
,
- controller:
'deleteCtrl'
- }
)
- }
)
;
services/memberService.js
This is the service that we created to handle our members and request.
- 'use strict'
;
- app.factory
(
'memberService'
,
function
(
$http)
{
- return
{
- read:
function
(
)
{
- var
read =
$http.get
(
'api/read.php'
)
;
- return
read;
- }
,
- create:
function
(
member)
{
- var
add =
$http.post
(
'api/add.php'
,
member)
;
- return
add;
- }
,
- update:
function
(
member)
{
- var
edit =
$http.post
(
'api/edit.php'
,
member)
;
- return
edit;
- }
,
- delete
:
function
(
member)
{
- var
del =
$http.post
(
'api/delete.php'
,
member)
;
- return
del;
- }
- }
- }
)
;
controller/homeController.js
This is our controller for home.html
.
- 'use strict'
;
- app.controller
(
'homeCtrl'
,
[
'$scope'
,
'memberService'
,
function
(
$scope,
memberService)
{
- //fetch members
- $scope.fetch
=
function
(
)
{
- var
members =
memberService.read
(
)
;
- members.then
(
function
(
response)
{
- $scope.members
=
response.data
;
- }
)
;
- }
- }
]
)
;
controller/addController.js
This the controller for our add.html
.
- 'use strict'
;
- app.controller
(
'addCtrl'
,
[
'$scope'
,
'memberService'
,
'$location'
,
function
(
$scope,
memberService,
$location)
{
- $scope.error
=
false
;
- //add member
- $scope.add
=
function
(
)
{
- var
addmember =
memberService.create
(
$scope.member
)
;
- addmember.then
(
function
(
response)
{
- if
(
response.data
.error
)
{
- $scope.error
=
true
;
- $scope.message
=
response.data
.message
;
- }
- else
{
- console.log
(
response)
;
- $location.path
(
'home'
)
;
- }
- }
)
;
- }
- }
]
)
;
controller/editController.js
This is our controller for edit.html
.
- 'use strict'
;
- app.controller
(
'editCtrl'
,
[
'$scope'
,
'memberService'
,
'$location'
,
'$stateParams'
,
function
(
$scope,
memberService,
$location,
$stateParams)
{
- $scope.error
=
false
;
- $scope.updatedmember
=
$stateParams.member
;
- //edit member
- $scope.update
=
function
(
)
{
- var
updatemember =
memberService.update
(
$scope.updatedmember
)
;
- updatemember.then
(
function
(
response)
{
- console.log
(
response)
;
- if
(
response.data
.error
)
{
- $scope.error
=
true
;
- $scope.message
=
response.data
.message
;
- }
- else
{
- console.log
(
response)
;
- $location.path
(
'home'
)
;
- }
- }
)
;
- }
- }
]
)
;
controller/deleteController.js
This is our controller for delete.html
.
- 'use strict'
;
- app.controller
(
'deleteCtrl'
,
[
'$scope'
,
'memberService'
,
'$location'
,
'$stateParams'
,
function
(
$scope,
memberService,
$location,
$stateParams)
{
- $scope.error
=
false
;
- $scope.deletemember
=
$stateParams.member
;
- //delete member
- $scope.delete
=
function
(
)
{
- var
dmember =
memberService.delete
(
$scope.deletemember
)
;
- dmember.then
(
function
(
response)
{
- if
(
response.data
.error
)
{
- $scope.error
=
true
;
- $scope.message
=
response.data
.message
;
- }
- else
{
- console.log
(
response)
;
- $location.path
(
'home'
)
;
- }
- }
)
;
- }
- }
]
)
;
Creating the Interfaces
Note: I compiled the following files inside partials
folder.
home.html
As per our ui-router, this is considered to be our index view.
- <div
class
=
"row"
ng-init=
"fetch()"
>
- <div
class
=
"col-md-8 col-md-offset-2"
>
- <button
href
=
""
class
=
"btn btn-primary"
ui-sref=
"add"
><i
class
=
"fa fa-plus"
></
i
>
Add New</
button
>
- <table
class
=
"table table-bordered table-striped"
style
=
"margin-top:10px;"
>
- <thead
>
- <tr
>
- <th
>
Firstname</
th
>
- <th
>
Lastname</
th
>
- <th
>
Address</
th
>
- <th
>
Action</
th
>
- </
tr
>
- </
thead
>
- <tbody
>
- <tr
ng-repeat=
"member in members"
>
- <td
>
{{ member.firstname }}</
td
>
- <td
>
{{ member.lastname }}</
td
>
- <td
>
{{ member.address }}</
td
>
- <td
>
- <button
type
=
"button"
class
=
"btn btn-success"
ui-sref=
"edit({member: member})"
><i
class
=
"fa fa-edit"
></
i
>
Edit</
button
>
- <button
type
=
"button"
class
=
"btn btn-danger"
ui-sref=
"delete({member: member})"
>
<i
class
=
"fa fa-trash"
></
i
>
Delete</
button
>
- </
td
>
- </
tr
>
- </
tbody
>
- </
table
>
- </
div
>
- </
div
>
add.html
This contains the add new form.
- <div
class
=
"row"
>
- <div
class
=
"col-sm-4 col-sm-offset-4"
>
- <div
class
=
"alert alert-danger text-center"
ng-show=
"error"
>
- <button
type
=
"button"
class
=
"close"
ng-click=
"clear()"
><span
aria-hidden=
"true"
>
×
</
span
></
button
>
- <i
class
=
"fa fa-warning"
></
i
>
{{ message }}
- </
div
>
- <div
class
=
"panel panel-default"
>
- <div
class
=
"panel-body"
>
- <h3
class
=
"text-center"
>
Add Form</
h3
>
- <div
class
=
"form-group"
>
- <label
>
Firstname:</
label
>
- <input
type
=
"text"
class
=
"form-control"
ng-model=
"member.firstname"
>
- </
div
>
- <div
class
=
"form-group"
>
- <label
>
Lastname:</
label
>
- <input
type
=
"text"
class
=
"form-control"
ng-model=
"member.lastname"
>
- </
div
>
- <div
class
=
"form-group"
>
- <label
>
Address:</
label
>
- <input
type
=
"text"
class
=
"form-control"
ng-model=
"member.address"
>
- </
div
>
- <button
type
=
"button"
class
=
"btn btn-primary"
ng-click=
"add()"
><i
class
=
"fa fa-save"
></
i
>
Save</
button
>
- <button
type
=
"button"
class
=
"btn btn-default pull-right"
ui-sref=
"home"
><i
class
=
"fa fa-arrow-left"
></
i
>
Back</
button
>
- </
div
>
- </
div
>
- </
div
>
- </
div
>
edit.html
This contains our edit form.
- <div
class
=
"row"
>
- <div
class
=
"col-sm-4 col-sm-offset-4"
>
- <div
class
=
"alert alert-danger text-center"
ng-show=
"error"
>
- <button
type
=
"button"
class
=
"close"
ng-click=
"clear()"
><span
aria-hidden=
"true"
>
×
</
span
></
button
>
- <i
class
=
"fa fa-warning"
></
i
>
{{ message }}
- </
div
>
- <div
class
=
"panel panel-default"
>
- <div
class
=
"panel-body"
>
- <h3
class
=
"text-center"
>
Edit Form</
h3
>
- <div
class
=
"form-group"
>
- <label
>
Firstname:</
label
>
- <input
type
=
"text"
class
=
"form-control"
ng-model=
"updatedmember.firstname"
>
- </
div
>
- <div
class
=
"form-group"
>
- <label
>
Lastname:</
label
>
- <input
type
=
"text"
class
=
"form-control"
ng-model=
"updatedmember.lastname"
>
- </
div
>
- <div
class
=
"form-group"
>
- <label
>
Address:</
label
>
- <input
type
=
"text"
class
=
"form-control"
ng-model=
"updatedmember.address"
>
- </
div
>
- <button
type
=
"button"
class
=
"btn btn-success"
ng-click=
"update()"
><i
class
=
"fa fa-check-square-o"
></
i
>
Update</
button
>
- <button
type
=
"button"
class
=
"btn btn-default pull-right"
ui-sref=
"home"
><i
class
=
"fa fa-arrow-left"
></
i
>
Back</
button
>
- </
div
>
- </
div
>
- </
div
>
- </
div
>
delete.html
This is delete confirmation view.
- <div
class
=
"row"
>
- <div
class
=
"col-sm-4 col-sm-offset-4"
>
- <div
class
=
"alert alert-danger text-center"
ng-show=
"error"
>
- <button
type
=
"button"
class
=
"close"
ng-click=
"clear()"
><span
aria-hidden=
"true"
>
×
</
span
></
button
>
- <i
class
=
"fa fa-warning"
></
i
>
{{ message }}
- </
div
>
- <div
class
=
"panel panel-default"
>
- <div
class
=
"panel-body"
>
- <h4
class
=
"text-center"
>
Are you sure you want to delete</
h4
>
- <h3
class
=
"text-center"
>
{{ deletemember.firstname + ' ' + deletemember.lastname }}</
h3
><br
>
- <button
type
=
"button"
class
=
"btn btn-danger"
ng-click=
"delete()"
><i
class
=
"fa fa-trash"
></
i
>
Delete</
button
>
- <button
type
=
"button"
class
=
"btn btn-default pull-right"
ui-sref=
"home"
><i
class
=
"fa fa-arrow-left"
></
i
>
Back</
button
>
- </
div
>
- </
div
>
- </
div
>
- </
div
>
Creating the PHP API Scripts
Note: I compiled the following files inside api
folder.
read.html
This is our PHP API the fetches data from our database.
- <?php
- $conn
=
new
mysqli(
'localhost'
,
'root'
,
''
,
'angular'
)
;
- $out
=
array
(
)
;
- $sql
=
"SELECT * FROM members"
;
- $query
=
$conn
->
query
(
$sql
)
;
- while
(
$row
=
$query
->
fetch_array
(
)
)
{
- $out
[
]
=
$row
;
- }
- echo
json_encode
(
$out
)
;
- ?>
add.html
Our PHP API that adds new data to our database.
- <?php
- $conn
=
new
mysqli(
'localhost'
,
'root'
,
''
,
'angular'
)
;
- $data
=
json_decode
(
file_get_contents
(
"php://input"
)
)
;
- $out
=
array
(
'error'
=>
false
,
'firstname'
=>
false
,
'lastname'
=>
false
,
'address'
=>
false
)
;
- $firstname
=
$data
->
firstname
;
- $lastname
=
$data
->
lastname
;
- $address
=
$data
->
address
;
- if
(
empty
(
$firstname
)
)
{
- $out
[
'firstname'
]
=
true
;
- $out
[
'message'
]
=
'Firstname is required'
;
- }
- elseif
(
empty
(
$lastname
)
)
{
- $out
[
'lastname'
]
=
true
;
- $out
[
'message'
]
=
'Lastname is required'
;
- }
- elseif
(
empty
(
$address
)
)
{
- $out
[
'address'
]
=
true
;
- $out
[
'message'
]
=
'Address is required'
;
- }
- else
{
- $sql
=
"INSERT INTO members (firstname, lastname, address) VALUES ('$firstname
', '$lastname
', '$address
')"
;
- $query
=
$conn
->
query
(
$sql
)
;
- if
(
$query
)
{
- $out
[
'message'
]
=
'Member Added Successfully'
;
- }
- else
{
- $out
[
'error'
]
=
true
;
- $out
[
'message'
]
=
'Cannot Add Member'
;
- }
- }
- echo
json_encode
(
$out
)
;
- ?>
edit.html
Our PHP API updates our selected data.
- <?php
- $conn
=
new
mysqli(
'localhost'
,
'root'
,
''
,
'angular'
)
;
- $data
=
json_decode
(
file_get_contents
(
"php://input"
)
)
;
- $out
=
array
(
'error'
=>
false
)
;
- $firstname
=
$data
->
firstname
;
- $lastname
=
$data
->
lastname
;
- $address
=
$data
->
address
;
- $memid
=
$data
->
memid
;
- $sql
=
"UPDATE members SET firstname = '$firstname
', lastname = '$lastname
', address = '$address
' WHERE memid = '$memid
'"
;
- $query
=
$conn
->
query
(
$sql
)
;
- if
(
$query
)
{
- $out
[
'message'
]
=
'Member updated Successfully'
;
- }
- else
{
- $out
[
'error'
]
=
true
;
- $out
[
'message'
]
=
'Cannot update Member'
;
- }
- echo
json_encode
(
$out
)
;
- ?>
delete.html
Lastly, this is our PHP API that deletes our selected data.
- <?php
- $conn
=
new
mysqli(
'localhost'
,
'root'
,
''
,
'angular'
)
;
- $data
=
json_decode
(
file_get_contents
(
"php://input"
)
)
;
- $out
=
array
(
'error'
=>
false
)
;
- $memid
=
$data
->
memid
;
- $sql
=
"DELETE FROM members WHERE memid = '$memid
'"
;
- $query
=
$conn
->
query
(
$sql
)
;
- if
(
$query
)
{
- $out
[
'message'
]
=
'Member deleted Successfully'
;
- }
- else
{
- $out
[
'error'
]
=
true
;
- $out
[
'message'
]
=
'Cannot delete Member'
;
- }
- echo
json_encode
(
$out
)
;
- ?>
DEMO
That's it! You can now test the Simple CRUD Web App using Angular JS and PHP in your browser. I hope this tutorial will help you to understand how to create a CRUD application in Angular JS and PHP and also for your future Web Application projects.
Explore more on this website for more Tutorials and Free Source Codes.
Happy Coding :)
Note: Due to the size or complexity of this submission, the author has submitted it as a .zip file to shorten your download time. After downloading it, you will need a program like Winzip to decompress it.
Virus note: All files are scanned once-a-day by SourceCodester.com for viruses, but new viruses come out every day, so no prevention program can catch 100% of them.
FOR YOUR OWN SAFETY, PLEASE:
1. Re-scan downloaded files using your personal virus checker before using it.
2. NEVER, EVER run compiled files (.exe's, .ocx's, .dll's etc.)--only run source code.
Download
You must upgrade your account or reply in the thread to view hidden text.