almaeean
Clutch Master
2
MONTHS
2 2 MONTHS OF SERVICE
LEVEL 1
200 XP
Now that you’ve learned what CodeIgniter is, our next step is on how to install CodeIgniter framework on your local computer running Apache, PHP, and MySQL. You may install Wampserver to run these three applications.
As you may know that a framework is just a bunch of code or a set of libraries and classes that you can reuse in your web application. So, instead of creating your own libraries and classes, CodeIgniter has it already and you can use it right away.
Step 1: Downloading CodeIgniter
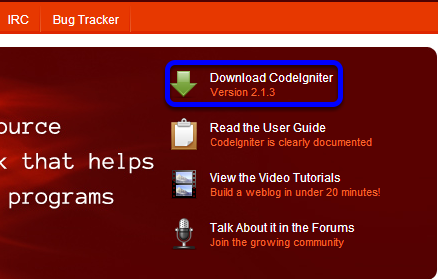
Open your favorite web browser and start typing www.codeigniter.com.
Click Download CodeIgniter and save it on your computer.
Step 2: Installing CodeIgniter
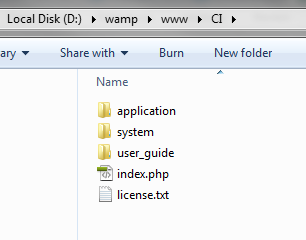
After downloading CodeIgniter, all you need to do is unzip it to your web server’s root directory. You can also extract it anywhere on your computer and add a virtual directory, but this is not what we’re going to do here.
In the example below, I extract the code in a directory called “CI”. You can choose any name you like.
Step 3: Exploring CodeIgniter
The important folders here in CodeIgniter are System and Application. System folder contains the framework you can use to call any function and or object in your web application.
The Application folder is where you add your own code. In good practice, it’s not advisable to touch the code within System’s folder.
Below is the file structure of Application’s folder:

Throughout your development stage, you will most likely access the Controllers, Models, and Views Model. This is where the MVC applied. A controller serves as an intermediary between Models and Views.
Example code of controller is accepting a value from previous page like using the GET or POST function.
The Model is the one who access your database. The view is where you put your HTML code.
Step 4: Configuring CodeIgniter
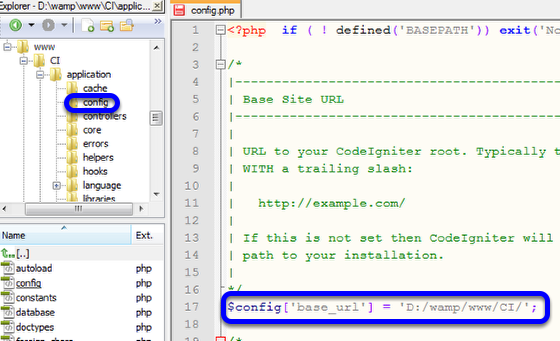
Before you can run your code using CodeIgniter, you need to configure the URL and the database you are using.
Just to get you started with CodeIgniter let’s configure the most common configuration.
Open your favorite PHP editor and navigate to config folder under application folder.
Config file
Database file
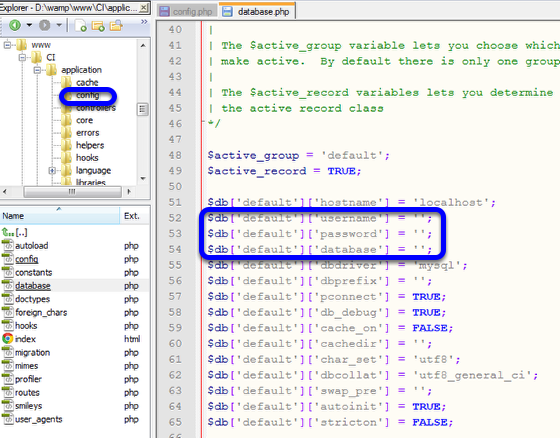
Follow the sample configuration below.
Now you’ve learned on how to configure CodeIgniter. On our next tutorial you will learn on how to start coding with CodeIgniter.
Book traversal links for Getting Started With CodeIgniter
As you may know that a framework is just a bunch of code or a set of libraries and classes that you can reuse in your web application. So, instead of creating your own libraries and classes, CodeIgniter has it already and you can use it right away.
Step 1: Downloading CodeIgniter
Open your favorite web browser and start typing www.codeigniter.com.
Click Download CodeIgniter and save it on your computer.
Step 2: Installing CodeIgniter
After downloading CodeIgniter, all you need to do is unzip it to your web server’s root directory. You can also extract it anywhere on your computer and add a virtual directory, but this is not what we’re going to do here.
In the example below, I extract the code in a directory called “CI”. You can choose any name you like.
Step 3: Exploring CodeIgniter
The important folders here in CodeIgniter are System and Application. System folder contains the framework you can use to call any function and or object in your web application.
The Application folder is where you add your own code. In good practice, it’s not advisable to touch the code within System’s folder.
Below is the file structure of Application’s folder:
Throughout your development stage, you will most likely access the Controllers, Models, and Views Model. This is where the MVC applied. A controller serves as an intermediary between Models and Views.
Example code of controller is accepting a value from previous page like using the GET or POST function.
The Model is the one who access your database. The view is where you put your HTML code.
Step 4: Configuring CodeIgniter
Before you can run your code using CodeIgniter, you need to configure the URL and the database you are using.
Just to get you started with CodeIgniter let’s configure the most common configuration.
Open your favorite PHP editor and navigate to config folder under application folder.
Config file
Database file
Follow the sample configuration below.
Now you’ve learned on how to configure CodeIgniter. On our next tutorial you will learn on how to start coding with CodeIgniter.
Book traversal links for Getting Started With CodeIgniter
- ‹ CodeIgniter Tutorial
- Up
- How I build User Registration and Form Validation Using CodeIgniter ›