kzed
AI Research Engineer
2
MONTHS
2 2 MONTHS OF SERVICE
LEVEL 1
400 XP
Starting the process of trying to develop a complex weather application requires a proper planning strategy. This also encompasses things like fetching meteorological data from an API, designing an interface that is not only functional and attractive, but comfortable on the eyes, as well as handling user interactions. Below I outline a step by step guidance filled with code examples to show how one can create a barebones weather application using HTML, CSS and JavaScript.
Step 1: Configure Your Development Environment
Before getting to work with the code make sure that your development toolkit contains the code editor for example Visual Studio Code, and you have some compatible web browser at your command.
Step 2: Architect the HTML Framework
Begin by crafting an HTML document (e.g., index.html)
that outlines the skeletal structure of your weather application. The ensuing HTML code can serve as your foundational blueprint:
- <!DOCTYPE html>
- <html
lang
=
"en"
>
- <head
>
- <meta
charset
=
"UTF-8"
>
- <meta
name
=
"viewport"
content
=
"width=device-width, initial-scale=1.0"
>
- <title
>
Weather App</
title
>
- <link
rel
=
"stylesheet"
href
=
"styles.css"
>
- </
head
>
- <body
>
- <div
class
=
"container"
>
- <h1
>
Weather App</
h1
>
- <input
type
=
"text"
id
=
"locationInput"
placeholder
=
"Enter a city"
>
- <button
id
=
"searchButton"
>
Search</
button
>
- <div
class
=
"weather-info"
>
- <h2
id
=
"location"
></
h2
>
- <p
id
=
"temperature"
></
p
>
- <p
id
=
"description"
></
p
>
- </
div
>
- </
div
>
- <script
src
=
"script.js"
></
script
>
- </
body
>
- </
html
>
Step 3: Refine the Aesthetic of Your Application
Next, fashion a CSS file (e.g., styles.css)
to imbue your weather application with a polished, visually pleasing design. Below is a foundational CSS code example:
- body {
- font-family
:
Arial,
sans-serif
;
- background-color
:
#f0f0f0
;
- }
- .container
{
- max-width
:
400px
;
- margin
:
0
auto
;
- text-align
:
center
;
- padding
:
20px
;
- background-color
:
rgba
(
255
,
255
,
255
,
0.5
)
;
/* Translucent background */
- border-radius
:
10px
;
- box-shadow
:
0
0
10px
rgba
(
0
,
0
,
0
,
0.3
)
;
/* Subtle shadow */
- margin-top
:
105px
;
- }
- h1 {
- font-size
:
24px
;
- }
- input[
type=
"text"
]
{
- width
:
100%
;
- padding
:
10px
;
- margin
:
10px
0
;
- border
:
1px
solid
#ccc
;
- border-radius
:
5px
;
- }
- button
{
- background-color
:
#007BFF
;
- color
:
#fff
;
- border
:
none
;
- padding
:
10px
20px
;
- border-radius
:
5px
;
- cursor
:
pointer
;
- }
- .weather-info
{
- margin-top
:
20px
;
- }
Step 4: Retrieve Weather Data Using JavaScript
For your weather application to be able to get the real time weather details you need to create a JavaScript file (e.g., script.js)
.This file will make use of a public weather API. In this case we’ll use Tomorrow.io Weather API. To continue, one has to enroll for a free API key with Tomorrow.io Weather API service that provides such a service.
Step 5: Obtain Your API Key
In order to obtain real-time weather data, one has to register for a free API key at Tomorrow.io or you can evolve to use any other historical weather API of your choice. Once you have got your API key, replace the 'YOUR_API_KEY'
placeholder in the JavaScript code with your genuine key.
This key is necessary for giving access to the weather API and allowing your application to send requests for genuine and timely meteorological data.
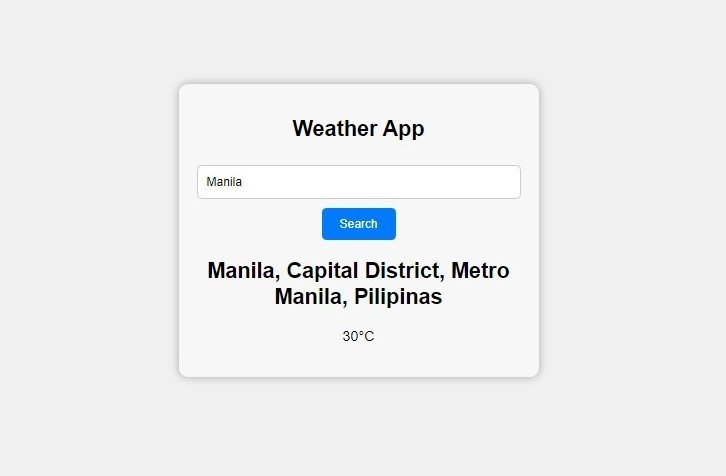
Step 6: Test Your Weather Application
In the end to be certain that everything is working as supposed open your html file (index.html)
on your web browser. In the text input field, insert name of any city of your choice and then proceed to click on the ‘Search’ button. The entered location must then be accompanied by the immediate display of the city/region name, temperature, and the prevailing weather conditions.
This check ensures that your app is able to parse data and provide a real time weather update based on any input provided by the user.
Step 7: Deploy Your Weather Application
If you want to share your weather app with others, that means you should open-source it and deploy it to a web host, or you could also use GitHub pages.
Dealing with this example will be useful to build a weather app from scratch. But it can be more preoccupied by adding weather icons, to include more comprehensive meteorological data, and to have five-day forecast. Also, such improvements like refinement of styling elements can make a very large difference to the whole user experience.
I hope that you found this how-to helpful and do not hesitate to tune in for the following guides. I wish it will be of great assistance to you when it comes to deploying your weather application.
Happy coding!
Download
You must upgrade your account or reply in the thread to view hidden text.