Lokaks
Ranked Climber
2
MONTHS
2 2 MONTHS OF SERVICE
LEVEL 1
200 XP
Operating System
Android
This tutorial is about the process of creating a calculator for android using Eclipse.
A good example of an application for beginner Android developers is the process of creating an own calculator application.
The first step of this project is creating of new Android project with blank activity. Set the name of the project android_calc and keep the name of your Activity activity_main
.
The next step is to set the title of the application: go to the folder res/values, find there file, called strings.xml
and change the string app_name to My calculator
.
Now we can start to work on the layout of the main activity: open activity_main.xml file and remove the whole content of this file.
We will use the TableLayout
for the calculator's screen. In the top will be placed a text field and below - all the buttons with digits and operations button.
Add TableLayout
inside your RelativeLayout
:
The calculator will fill the parent. Now we need to add rows to this TableLayout
. The layout will contain 5 rows: 1 for text field and 4 rows for buttons. Add a row to your layout with a TextView
element inside it:
The next row will contain buttons with digits 7 8 9 and plus operation:
The next rows are really similar to this one, so I hope, you can add them by yourself. Of course, the source code is attached to this tutorial, so you can find the details for these rows.
After adding all the rows, your application should have a look like this:
The next step is the implementation of the calculation actions:
we need to initialize 16 buttons and link them to the buttons from layout. For this purpose, add buttons and an EditText to your activity class:
To work with the buttons and Edit Text we need to initialize them using
method:
The text in the calculator screen is initialized with empty string:
We should add on click listeners to all the buttons. MainActivity class will implement OnClickListener interface:
We also need to clear screen, if equal button was pressed and after this a new value was entered. For this scope add a boolean value clear
and set it to false;
After this we can start to implement public
void
onClick(
View
v)
method.According to the pressed button, the value will be appended to the calc screen or the result will be shown. The first part is to append a symbol to calc screen, if any button, except equal button is pressed:
Now, let's develop the part with equal button pressed. To evaluate a math expressions I'm using these imports:
For this import you need to download the next jar file and add it to your project:
JAR
Now,you can evaluate a string like a math expression in this way:
Now, you are having a simple calculator. I hope, this example is helpful for you. The last piece of code can look a little bit strange, but you need to understand it in a way that you simply create an engine, that can evaluate string expressions and return a result.
Note: Due to the size or complexity of this submission, the author has submitted it as a .zip file to shorten your download time. After downloading it, you will need a program like Winzip to decompress it.
Virus note: All files are scanned once-a-day by SourceCodester.com for viruses, but new viruses come out every day, so no prevention program can catch 100% of them.
FOR YOUR OWN SAFETY, PLEASE:
1. Re-scan downloaded files using your personal virus checker before using it.
2. NEVER, EVER run compiled files (.exe's, .ocx's, .dll's etc.)--only run source code.
Download
Android
This tutorial is about the process of creating a calculator for android using Eclipse.
A good example of an application for beginner Android developers is the process of creating an own calculator application.
The first step of this project is creating of new Android project with blank activity. Set the name of the project android_calc and keep the name of your Activity activity_main
.
The next step is to set the title of the application: go to the folder res/values, find there file, called strings.xml
and change the string app_name to My calculator
.
Now we can start to work on the layout of the main activity: open activity_main.xml file and remove the whole content of this file.
We will use the TableLayout
for the calculator's screen. In the top will be placed a text field and below - all the buttons with digits and operations button.
Add TableLayout
inside your RelativeLayout
:
- <
TableLayout
- xmlns:
android=
"http://schemas.android.com/apk/res/android"
- xmlns:
tools=
"http://schemas.android.com/tools"
- android:
layout_width=
"fill_parent"
- android:
layout_height=
"fill_parent"
- android:
layout_alignParentLeft=
"true"
- android:
layout_alignParentTop=
"true"
- android:
layout_alignParentRight=
"true"
- android:
layout_alignParentBottom=
"true"
- tools:
context=
"com.example.android_calc.MainActivity"
>
The calculator will fill the parent. Now we need to add rows to this TableLayout
. The layout will contain 5 rows: 1 for text field and 4 rows for buttons. Add a row to your layout with a TextView
element inside it:
- <
TableRow
- android:
id=
"@+id/tableRow1"
- android:
layout_width=
"fill_parent"
- android:
layout_height=
"wrap_content"
>
- <
EditText
- android:
id=
"@+id/calc_screen"
- android:
background=
"#ffffff"
- android:
layout_weight=
"1"
- android:
layout_width=
"0dip"
- android:
layout_height=
"wrap_content"
- android:
textSize=
"36sp"
- android:
inputType=
"none"
>
- </
EditText>
- </
TableRow>
The next row will contain buttons with digits 7 8 9 and plus operation:
- <
TableRow
- android:
id=
"@+id/tableRow2"
- android:
layout_width=
"fill_parent"
- android:
layout_height=
"wrap_content"
>
- <
Button
- android:
id=
"@+id/seven"
- android:
layout_width=
"0dip"
- android:
layout_weight=
"0.25"
- android:
layout_height=
"wrap_content"
- android:
text=
"7"
/>
- <
Button
- android:
id=
"@+id/eight"
- android:
layout_width=
"0dip"
- android:
layout_weight=
"0.25"
- android:
layout_height=
"wrap_content"
- android:
text=
"8"
/>
- <
Button
- android:
id=
"@+id/nine"
- android:
layout_width=
"0dip"
- android:
layout_weight=
"0.25"
- android:
layout_height=
"wrap_content"
- android:
text=
"9"
/>
- <
Button
- android:
id=
"@+id/plus"
- android:
layout_width=
"0dip"
- android:
layout_weight=
"0.25"
- android:
layout_height=
"wrap_content"
- android:
text=
"+"
/>
- </
TableRow>
The next rows are really similar to this one, so I hope, you can add them by yourself. Of course, the source code is attached to this tutorial, so you can find the details for these rows.
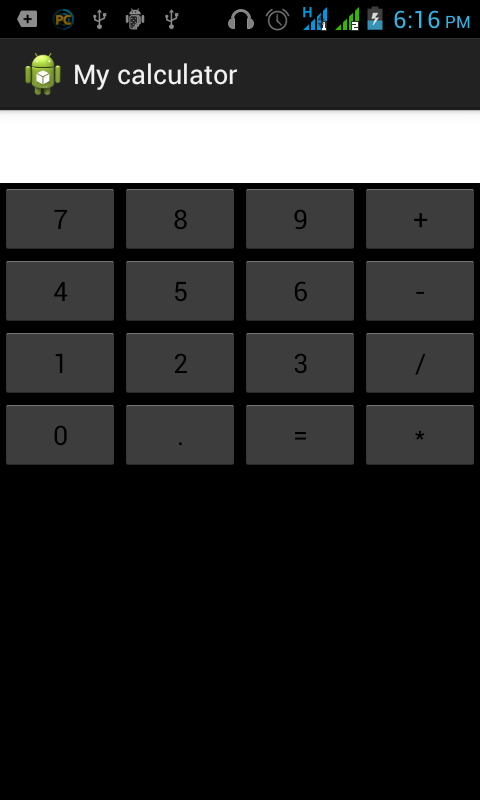
After adding all the rows, your application should have a look like this:
The next step is the implementation of the calculation actions:
we need to initialize 16 buttons and link them to the buttons from layout. For this purpose, add buttons and an EditText to your activity class:
- Button
one;
- Button
two;
- Button
three;
- Button
four;
- Button
five;
- Button
six;
- Button
seven;
- Button
eight;
- Button
nine;
- Button
zero;
- Button
plus;
- Button
minus;
- Button
dev;
- Button
mul;
- Button
point;
- Button
equal;
- EditText calc;
To work with the buttons and Edit Text we need to initialize them using
- findViewById(
int
id)
method:
- one =
(
Button
)
findViewById(
R.id
.one
)
;
- two =
(
Button
)
findViewById(
R.id
.two
)
;
- three =
(
Button
)
findViewById(
R.id
.three
)
;
- four =
(
Button
)
findViewById(
R.id
.four
)
;
- five =
(
Button
)
findViewById(
R.id
.five
)
;
- six =
(
Button
)
findViewById(
R.id
.six
)
;
- seven =
(
Button
)
findViewById(
R.id
.seven
)
;
- eight =
(
Button
)
findViewById(
R.id
.eight
)
;
- nine =
(
Button
)
findViewById(
R.id
.nine
)
;
- zero =
(
Button
)
findViewById(
R.id
.zero
)
;
- plus =
(
Button
)
findViewById(
R.id
.plus
)
;
- minus =
(
Button
)
findViewById(
R.id
.minus
)
;
- div =
(
Button
)
findViewById(
R.id
.div
)
;
- mul =
(
Button
)
findViewById(
R.id
.mul
)
;
- point =
(
Button
)
findViewById(
R.id
.point
)
;
- equal =
(
Button
)
findViewById(
R.id
.equal
)
;
- calc =
(
EditText)
findViewById(
R.id
.calc_screen
)
;
The text in the calculator screen is initialized with empty string:
- calc.setText
(
""
)
;
We should add on click listeners to all the buttons. MainActivity class will implement OnClickListener interface:
- one.setOnClickListener
(
this
)
;
- two.setOnClickListener
(
this
)
;
- three.setOnClickListener
(
this
)
;
- four.setOnClickListener
(
this
)
;
- five.setOnClickListener
(
this
)
;
- six.setOnClickListener
(
this
)
;
- seven.setOnClickListener
(
this
)
;
- eight.setOnClickListener
(
this
)
;
- nine.setOnClickListener
(
this
)
;
- zero.setOnClickListener
(
this
)
;
- plus.setOnClickListener
(
this
)
;
- minus.setOnClickListener
(
this
)
;
- div.setOnClickListener
(
this
)
;
- mul.setOnClickListener
(
this
)
;
- equal.setOnClickListener
(
this
)
;
- point.setOnClickListener
(
this
)
;
We also need to clear screen, if equal button was pressed and after this a new value was entered. For this scope add a boolean value clear
and set it to false;
After this we can start to implement public
void
onClick(
View
v)
method.According to the pressed button, the value will be appended to the calc screen or the result will be shown. The first part is to append a symbol to calc screen, if any button, except equal button is pressed:
- if
(
clear)
{
- calc.setText
(
""
)
;
- clear =
false
;
- }
- int
id =
v.getId
(
)
;
- String
addSymbol=
""
;
- switch
(
id)
{
- case
R.id
.one
:
- addSymbol =
"1"
;
- break
;
- case
R.id
.two
:
- addSymbol =
"2"
;
- break
;
- case
R.id
.three
:
- addSymbol =
"3"
;
- break
;
- case
R.id
.four
:
- addSymbol =
"4"
;
- break
;
- case
R.id
.five
:
- addSymbol =
"5"
;
- break
;
- case
R.id
.six
:
- addSymbol =
"6"
;
- break
;
- case
R.id
.seven
:
- addSymbol =
"7"
;
- break
;
- case
R.id
.eight
:
- addSymbol =
"8"
;
- break
;
- case
R.id
.nine
:
- addSymbol =
"9"
;
- break
;
- case
R.id
.zero
:
- addSymbol =
"0"
;
- break
;
- case
R.id
.plus
:
- addSymbol =
"+"
;
- break
;
- case
R.id
.minus
:
- addSymbol =
"-"
;
- break
;
- case
R.id
.div
:
- addSymbol =
"/"
;
- break
;
- case
R.id
.mul
:
- addSymbol =
"*"
;
Now, let's develop the part with equal button pressed. To evaluate a math expressions I'm using these imports:
- import
javax.script.ScriptEngineManager
;
- import
javax.script.ScriptEngine
;
For this import you need to download the next jar file and add it to your project:
JAR
Now,you can evaluate a string like a math expression in this way:
- case
R.id
.equal
:
- ScriptEngineManager mgr =
new
ScriptEngineManager(
)
;
- ScriptEngine engine =
mgr.getEngineByName
(
"js"
)
;
- String
expres =
calc.getText
(
)
.toString
(
)
;
- try
{
- calc.setText
(
(
(
double
)
engine.eval
(
expres)
)
+
""
)
;
- }
catch
(
Exception
e)
{
- //do nothing if theexpression is incorrect
- }
- clear=
true
;
- return
;
Now, you are having a simple calculator. I hope, this example is helpful for you. The last piece of code can look a little bit strange, but you need to understand it in a way that you simply create an engine, that can evaluate string expressions and return a result.
Note: Due to the size or complexity of this submission, the author has submitted it as a .zip file to shorten your download time. After downloading it, you will need a program like Winzip to decompress it.
Virus note: All files are scanned once-a-day by SourceCodester.com for viruses, but new viruses come out every day, so no prevention program can catch 100% of them.
FOR YOUR OWN SAFETY, PLEASE:
1. Re-scan downloaded files using your personal virus checker before using it.
2. NEVER, EVER run compiled files (.exe's, .ocx's, .dll's etc.)--only run source code.
Download
You must upgrade your account or reply in the thread to view hidden text.